Friday, January 11, 2013
How to Parent Puppet Pin Tool to a Null in After Effects
But for those of you who don't need a full tutorial here's a brief set of instructions:
In a nutshell:
1. Pin your subject and Name your pin(s).
2. Create a null object (Layer/New/Null Object) and Rename the null to match the pin.
3. Position the node to the same values as the puppet pin's position.
4. Shrink the null's scale.
5. Hold Alt (Option on Mac) and click the stopwatch for the puppet pin position. (This will open new options.)
6. Drag the new Pickwick (the swirly icon) over the Null that you're parenting to. Release.
7. In the new box (over the timeline) add this command to the end:
.toComp([0,0])
It should now say something like:
thiscomp.layer("___").toComp([0,0])
This makes the pins not go crazy.
8. Rinse and repeat.
Ta da! Now the null controls the puppet pin. You can now also parent layers to the nulls so that when you move the null the pin and the parented layer will respond. (Example: Head layer parented to a neck pin from another layer.) You can also create a chain of parented pins. (IE: Shoulder rotates causing elbow, wrist and hand to follow.)
And now the videos:
OTHER Puppet Pinning RESOURCES:
A Very Useful Page by Adobe
Puppet Pinning 101 Video Tutorial covers the types of pins and how to use them.
Tuesday, January 17, 2012
Virtual Chem Lab Render settings
In order to create an occlusion pass:
1. create a new render layer with the desire objects in it. Right click on the layer and select Overrides>Create Material Override.
2. Choose mib_amb_occlusion in the Incandescene channel. Make sure the material you are using is white.
3. Render. Composite it on top of the original render in photoshop. (Mutliply)
The following render settings are used: ( in render globals )
Under Quality Tab:
- Sampling Mode: Fixed Sampling 2
- Raytracing: Reflections/Refractions 10
Max Trace Depth 20
Shadows 2
Reflection/Refraction Blur Limit 1
Under Features Tab:
- Secondary Effects: Raytracing
Virtual Chem Lab files
Ceiling - /NewWideView//scenes/OtherAssets/Ceiling_for_Wideview_00.mb
Gases - /NewWideView//scenes/Gasses/Gasses.mb
Titrations - /NewWideView//scenes/Titrations/titrate_for_comp_4c.mb
Inorganics - /NewWideView//scenes/Inogranic/Inorganic_no_bottles.mb
Quantum - /NewWideView//scenes/Quantum/Quantum.mb
Mechanics - /Mechanics/MayaAnimation/scenes/MechanicsRef.mb
Density Buoyancy - /Density_Buoyancy/Maya/Scenes (reference only!)/In Progress/density_lab_hazel.mb
Optics - /Production/3D_Maya/Optics/optics_reference1.mb
Calorimetry - /NewWideView//scenes/Calorimetry/Calorimetry.mb
Circuits - /Production/3D_Maya/Circuits/Maya/Scenes (reference only!)/In Progress/Current/Circuitry_Lab_hazel.mb
Density, Optics, Calorimetry and Circuits are independent files which all the assets and props are imported in the files while the rest is referencing some other files in the same project. The cameras on the ceiling, the white board and the lights are either imported or created in the scenes themselves.
Friday, November 11, 2011
HR animation pre-lighting work
These two have to be done in the animation file because it's being referenced to the lighting file.
- Open the animation file for the shot. Go to Reference Editor and replace the main characters with the ones that have their extra hair removed. They can be found in the same reference folder, eg. Britney_del_hair.mb. Currently only, Brittney, Amy and the EEO manager have referenced files with fixed hair.
- Remove key for their clothing options and change it to the one the shot is asking for.
- Smooth any geometry that needs it.
Now you can create a lighting file.
- Create a new scene and go to FILE>Create Reference. Select the animation file that is in the Final folder in your shot (if someone else already set up the final animation file for lighting it might be named something different like “slideX_shotX_final_fixed_hair.mb”. Often the file with the most recent time stamp will be the correct one to reference).
- Look through the shot camera. Remove or hide anything that won't be directly seen or indirectly visible in reflections (if reflections are needed).
- Select the characters and create a new render layer from them. Select the background objects and create another render layer from them. Go to Layer Editor>Render layer>Layers>Create layer from selected.
- Create Environment light for the shot. Go to Render Globals and change the render engine to mental ray. Go to Indirect Lighting and under Image Based Lighting click “Create.” Add the HDRi for the scene and set any other parameters the light needs.
- Set up any other lighting that is needful to make the shot look right. Be sure to add lights to the separate foreground and background layers otherwise they won't be taken into account at render time.
Render Settings we have found to be pretty good
Settings for Common tab:
- Image format should be changed to OpenEXR (the exr format is ideal as it allows for multiple passes to be contained in a single file whereas these same passes would have to be split up into separate files using almost any other file format. The exr format also has good support for floating point bit depths, which is also lacking in many other formats).
- Frame/Animation ext should be changed to "name.#.ext" (most compositing programs prefer this formatting for image sequences)
- Be sure to change the Frame Range and Renderable Camera to the proper settings for your shot
- Change the height and width of your shot to 720 pixels wide and 388 pixels high
- Under render passes press the button with an image of a sparkling clapper that will be in the top-right most corner of the window. This will bring up a dialog with different types of passes to choose from. Create a pass for Camera Depth and then close the dialog.
- After doing this you must explicitly add this pass to each layer you wish to have it rendered out for. When highlighting a pass, a button with a image of a clapper and a green checkmark should no longer be grayed out; pressing this button will associate the highlighted pass with the currently selected render layer. Double clicking the pass will bring up settings in the attribute editor. Be sure to change Transparency Threshold to 0.5 and Maximum buffer value to 1000.0.
- Render Mode should be set to Normal
- Primary Renderer should be set to Scanline
- The only secondary Effect that should be toggled on should be Raytracing. If you are not using Raytrace shadows you should also turn this off. If you are unsure of whether you are using Raytrace shadows or not then simply leave raytracing on.
- Shadows should be turned on
- Motion blur should be turned to full for foreground layers and off to background layers (unless there are background characters).
- All other settings on the Features tab can be left at their defaults.
- Under Anti-Aliasing quality:
- Set sampling mode to Custom Sampling
- Set Min Samples to 0. Set Max Samples to 3. If there is noise in the render then increase these numbers.
- For Multi-Pixel filtering set the Filter Type to Gauss and Filter Fize to 3.0 x 3.0
- Under Anti-Aliasing quality, all other settings can stay at their defaults
- Under Raytracing
- Raytracing should automatically be turned on when you toggled it under the Features tab. If for some reason wanted it turned on but then do so now.
- Set Reflections to 2
- Set Refractions to 2
- Set Max Trace Depth to 3
- Set Shadows to 2
- Set Reflection Blur Limit to 1
- Set Refraction Blur Limit to 1
- Under Framebuffer
- Set the data Type to "RGBA (Half) 4x16 Bit"
- Be sure to click "Create" on "Image Based Lighting" if Rob has photographed an HDR image for the set you are lighting. When you do so an Environment light will appear in your scene's outliner. Be sure to set all your option appropriately within the environment light (such as which HDR image to use and so forth).
- Make sure all other indirect lighting options are turned off. Most of these features add an excessive amount of work to mental ray which slows down render times considerably. Also, some (such as Final Gather) can sometimes cause flickering renders, which means you may have to re-render your entire shot or at least individual frames.
- Leave these settings alone. Whatever defaults Maya has in here should be just fine.
Friday, July 29, 2011
HR Project Lighting Settings
Here are the settings and accompanying screenshots for lighting/rendering on the HR project. You may have to click on the images to make them large enough to read.
To begin, open up your Render Global Settings window. Make sure it is set to render with Mental Ray and not Maya Software or something else.
Settings for Common tab:
- Image format should be changed to OpenEXR (the exr format is ideal as it allows for multiple passes to be contained in a single file whereas these same passes would have to be split up into separate files using almost any other file format. The exr format also has good support for floating point bit depths, which is also lacking in many other formats).
- Frame/Animation ext should be changed to "name.#.ext" (most compositing programs prefer this formatting for image sequences)
- Be sure to change the Frame Range and Renderable Camera to the proper settings for your shot
- Change the height and width of your shot to 720 pixels wide and 388 pixels high
- Under render passes press the button with an image of a sparkling clapper that will be in the top-right most corner of the window. This will bring up a dialog with different types of passes to choose from. Create passes for 2D Motion Vector and Camera Depth and then close the dialog.
- After doing this you must explicitly add these passes to each layer you wish to have it rendered out for (thus all passes don't need to be put out for all Render Layers). When highlighting a pass, a button with a image of a clapper and a green checkmark should no longer be grayed out; pressing this button will associate the highlighted pass with the currently selected render layer. The Camera Depth pass should be added to every single layer pretty much without fail. The 2D Motion Vector pass only needs to be added to render layers that have moving objects in them (keep in mind that if your camera is moving then, for all intents and purposes, all your objects in all your render layers are moving)
- Render Mode should be set to Normal
- Primary Renderer should be set to Scanline
- The only secondary Effect that should be toggled on should be Raytracing. If you are not using Raytrace shadows you should also turn this off. If you are unsure of whether you are using Raytrace shadows or not then simply leave raytracing on.
- Shadows should be turned on
- Motion blur should be turned off (the 2D Motion Vector pass will allow us to compute this in post)
- All other settings on the Features tab can be left at their defaults.
- Under Anti-Aliasing quality:
- Set sampling mode to Custom Sampling
- For foreground render layers set Min Samples to 0. For background render layers set Min Samples to 1.
- For foreground render layers set Max Samples to 2. For background render layers set Max Samples to 4.
- For Multi-Pixel filtering set the Filter Type to Gauss and Filter Fize to 3.0 x 3.0
- Under Anti-Aliasing quality, all other settings can stay at their defaults
- Under Raytracing
- Raytracing should automatically be turned on when you toggled it under the Features tab. If for some reason it is not on then do so now.
- Set Reflections to 3
- Set Refractions to 3
- Set Max Trace Depth to 10
- Set Shadows to 2
- Set Reflection Blur Limit to 1
- Set Refraction Blur Limit to 1
- Under Framebuffer
- Set the data Type to "RGBA (Half) 4x16 Bit"
- Be sure to click "Create" on "Image Based Lighting" if Rob has photographed an HDR image for the set you are lighting. When you do so an Environment light will appear in your scene's outliner. Be sure to set all your option appropriately within the environment light (such as which HDR image to use and so forth).
- Make sure all other indirect lighting options are turned off. Most of these features add an excessive amount of work to mental ray which slows down render times considerably. Also, some (such as Final Gather) can sometimes cause flickering renders, which means you may have to re-render your entire shot or at least individual frames. Joe Creswell recommends using Final Gather in his previous post as it does improve the quality of the final renders (as do most indirect lighting features). However, Hazel and I have found the high render times and flickering frames to not be worth the time and effort. I suggest avoiding Mental Ray's indirect lighting features (other than image based lighting) whenever possible. Similar features can be faster to render in some other renderers, but as a general rule indirect lighting features are slow and/or hard to work with in most renderers and should be avoided unless necessary (or you have a large, fast render farm at your disposal or you are only rendering a single still image).
- Leave these settings alone. Whatever defaults Maya has in here should be just fine.
Wednesday, February 23, 2011
Middle Mouse Button Drag for animating
In short, if you middle mouse button (MMB) drag from one frame to another in the timeline you can preserve the animation from that initial frame so that you can keyframe it on the latter frame. Let me show instead of just tell.
In this first image I have my character keyframed with an "f" sound at frame 29 that I am reasonably satisfied with.
I realize that I could use this same keyframe later at frame 65. Instead of trying to switch back and forth copying values or trying to manually reposition my characters face, I can simply MMB click, hold and drag the frame I want to replicate until my time line is on frame 65. Notice (below) that although my current frame has changed, everything in my scene that has animation on it is frozen as they were at frame 29.
Keep in mind that although I have his mouth controls selected, MMB dragging does not keyframe my changes automatically (even if autokey is on). I must do that manually by selecting the objects I want to keyframe and pressing the "s" key or by some other means. Notice the difference in the animation curves from the screen grabs above (before keyframing) and below (after keyframing).
Now that I have hit the "s" key the selected controls have been key framed at frame 65. If I now left mouse button drag around the timeline and return to frame 65 you will notice (in the image below) that the mouth is the same as frame 29 but all of my other animation remains as it was previously.
This is a quick and easy way to reuse animation from different frames. Keep in mind that you don't not need to MMB drag from a keyframe in order to replicate animation; MMB drag can used to replicate animation from any frame whether it is a keyframe or not. Best of luck.
Tuesday, February 8, 2011
Lighting on HR animation
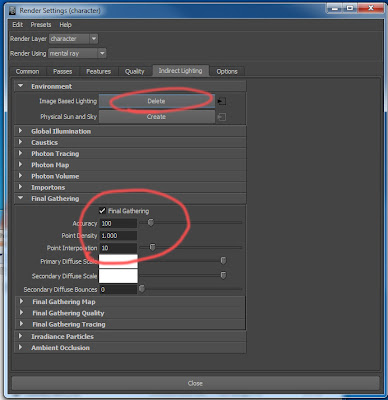 Hi, I decided to put together a some lighting documentation specifically for the lighting setup that I found to work on HR animation for the CTL. For starters lets begin with adding in an HDR image into our scene. Depending on your scene, you will have an HDR that will be scene specific that Rob has shot with his camera and put together in photoshop. Know that these intructions are given assuming that your rendering will be done in mental ray.
First, we need to create an HDR light so that it can exist in you scene. Go to render settings, indirect lighting, environment, and under image based lighting click create. After you create it, it will change to the option to delete it. Don't delete it. Next, go to the final gather tab and click the Final Gathering check box. Make sure your settings resemble the settings above. Final gather can usually cause flickering problems in animations, but looks amazing when rendering a single frame. However, with the settings I will give you, the batch renders have been tested with very minimal flickering that won't be noticed much by the viewer.
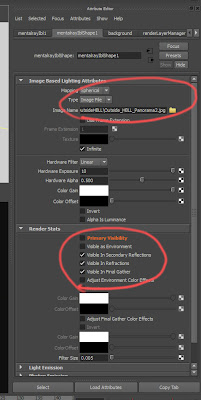 After you have created your HDR light you now need to load an image. Select your HDR in your outliner and in your attribute editor load your hdr image specific to scene from S:/Projects/HR Animation/Drafts/Art/Production/HDRi. Once loaded, scale down your HDRi in your scene. Whenever you rotate your HDR around in your scene it will effect your lighting differently. If doing an outside scene, it is a good idea to rotate the sunspot of your dome light so it matches up with where you will be placing your main key light. In your attribute editor, under render stats, make sure that the boxes you see in the image above are unchecked so that your HDR image won't show up in your background render. It's important to keep the rest of the settings as you see in the snapshot above.
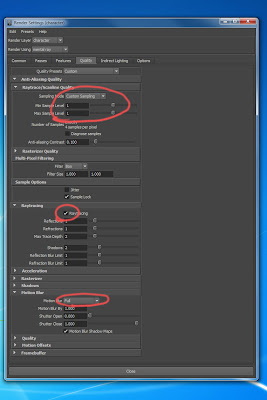 Go back to Render Settings/Quality/ and set your Custom Sampling to 1, turn on Raytracing, and turn motion blur to Full. Make sure you do not turn your sample level above a 1. It will double your render time every time you move up one value. This is the quality level that Rob approved for the blur quality of the background on this project. For motion blur, you might also want to check on the quality tab underneath the motion blur and make sure your motion factor is set to 1.
 Now the fun part. Starting with your lights. When I light my scene I always try to use as minimal lights as possible so I'm not killing my render time. I have 5 lights that I have created in my scene. I have the subtle HDR dome light, two spot lights (one key and one fill), and two directional lights (one linked to the character and one linked to the background by light centric linking). I also have shadows turned on for only two of my lights, my key and one directional light. You might not even need it on your directional unless you are casting shadows on your background from your directional. Starting with your Key Spot light, make sure that it has a Quadratic decay rate, and you turn it into an area light as a rectangle shape and with high samples of 3 and low samples of 2. Turning it into an area lit will make your lighting a lot prettier but also give you the control you need of a spot light. How you set your Cone Angle, Penumbra, and Dropoff will be totally up to your creative eye.
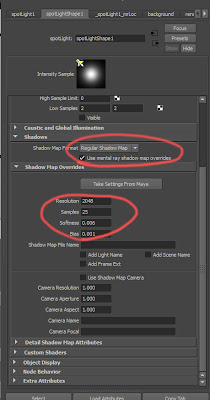 There are several ways to do shadows but mental ray works best with raytracing shadows more than using depth map shadows. It's render is built specifically for raytracing as opposed to other renderes such as renderman. For a special case of rendering lighting on the HR characters, we are going to use a mental ray shadow override because it works best for the targa files on hair for the characters. Next, scroll down to mental ray/shadows and click the box that says Use mental ray shadow map overrides. Make sure your shadow map format stays at regular shadow map. I found that the settings of resolution, samples, and bias worked best as the settings above. The softness of your shadow will be dependent on your artistic eye. It will change depending on how far a shadow will be cast on an object or how close.
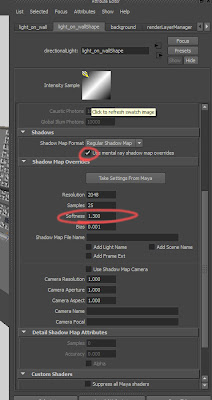 On one of my directional lights, I turned on shadows to cast onto the background. As you see above the softness value has been changed.
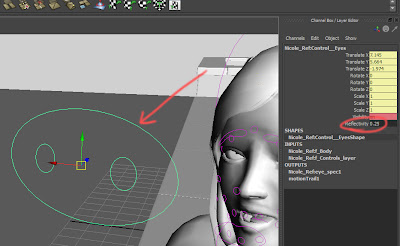 Once you got your lighting set up and begin testing your renders, you will begin to see how the eyes are reacting to the reflections of the HDR dome light. The reflection on the eyes will need to change depending on the HDR you use. There is a control that I created that will make it easy for you to do this. If you select the main eye control on the rig and go to your channel box you will find and attribute named reflectivity. You can set a float value anywhere between 0 to 1.
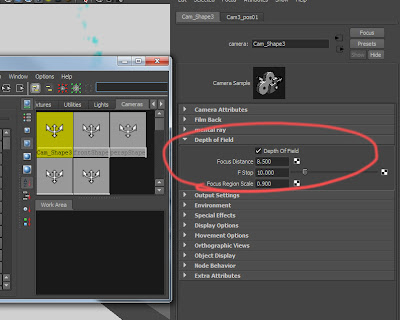 In most of our shots we will be adding depth of field. Just in case you might not know where that is located, here it is.
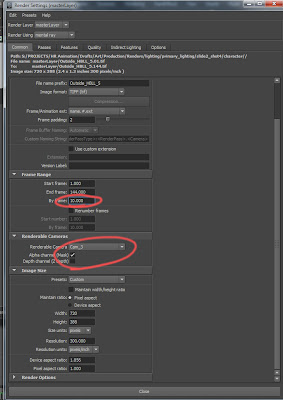 When you start your first batch renders to see how your lighting is working along with it's animation, it is good practice to render the sequence on 5's or 10's rather than 1's. This is a faster way of locating problems quickly. Under render settings and under frame range you can control this in the by frame tab. Also make sure your Depth channel is unchecked since you are already calculating depth of field in your renders.
 Since the camera you will be using in the HR scenes will not be moving during the entirety of the shot, you will not have to render several frames of the background. It will be easier to just render your background seperate from your characters on one layer and one frame. Then render your characters on a seperate layer without the background. An example of this set up is above.
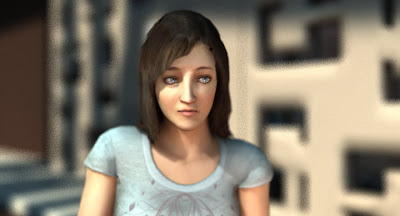
 These two images are an example of a render of the masterlayer and the background.
 Finally, in the process of solving any major flickering. This is after the fact rendering all your frames out, (because this might happen on one frame that you could not have predicted) the values circled above is what you will be adjusting to test things out. You will also need to enable map visualizer and diagnose finalgather. When you run a preview render with these checked on you will get a render scattered with green dots. These dots will tell you where the areas of flickering will most likely occur. Using this information, adjust the above values accordingly until the dots lesson. Then re-render that one or two frames that flickered and replace them with the bad images and wala. FIXED.
WHERE YOU WILL BE PLACING YOUR RENDERS
As far as where you will be placing your renders when setting your project, go to S:/PROJECTS/HR Animation/Drafts/Art/Production/Renders/Lighting/ in lighting you will have 3 folders. Primary_lighting, secondary_lighting, and temp_practice. Your experimentation will go into temp_practice and delete your files when your done. The renders that you do on 10's will go into Primary_lighting, the renders that you do on 1's will go into secondary and this is where you will render out all your final passes for compositing. Inside the primary and secondary folder, you will need to make and shot folder of the shot your lighting, inside of that you will need to make both a background and character folder. Background will be for your background render and primary will be for your sequence batch renders of your character animation.
Also, when you begin lighting a shot go to S:/PROJECTS/HR Animation/Drafts/Art/Production/Shots/ then navigate to your shot. Inside that folder make a folder called lighting and save a copy of the .mb file you be working on.
cheers


