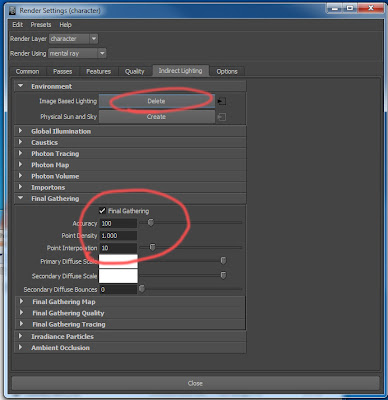
 Hi, I decided to put together a some lighting documentation specifically for the lighting setup that I found to work on HR animation for the CTL. For starters lets begin with adding in an HDR image into our scene. Depending on your scene, you will have an HDR that will be scene specific that Rob has shot with his camera and put together in photoshop. Know that these intructions are given assuming that your rendering will be done in mental ray.
First, we need to create an HDR light so that it can exist in you scene. Go to render settings, indirect lighting, environment, and under image based lighting click create. After you create it, it will change to the option to delete it. Don't delete it. Next, go to the final gather tab and click the Final Gathering check box. Make sure your settings resemble the settings above. Final gather can usually cause flickering problems in animations, but looks amazing when rendering a single frame. However, with the settings I will give you, the batch renders have been tested with very minimal flickering that won't be noticed much by the viewer.
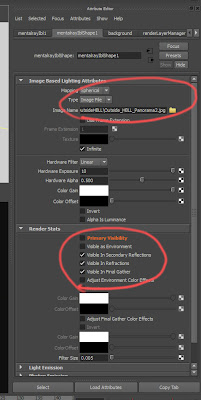 After you have created your HDR light you now need to load an image. Select your HDR in your outliner and in your attribute editor load your hdr image specific to scene from S:/Projects/HR Animation/Drafts/Art/Production/HDRi. Once loaded, scale down your HDRi in your scene. Whenever you rotate your HDR around in your scene it will effect your lighting differently. If doing an outside scene, it is a good idea to rotate the sunspot of your dome light so it matches up with where you will be placing your main key light. In your attribute editor, under render stats, make sure that the boxes you see in the image above are unchecked so that your HDR image won't show up in your background render. It's important to keep the rest of the settings as you see in the snapshot above.
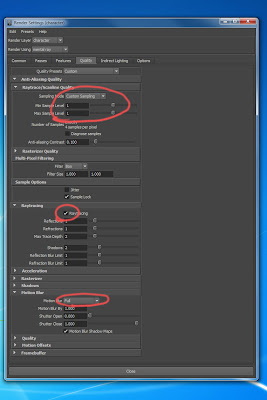 Go back to Render Settings/Quality/ and set your Custom Sampling to 1, turn on Raytracing, and turn motion blur to Full. Make sure you do not turn your sample level above a 1. It will double your render time every time you move up one value. This is the quality level that Rob approved for the blur quality of the background on this project. For motion blur, you might also want to check on the quality tab underneath the motion blur and make sure your motion factor is set to 1.
 Now the fun part. Starting with your lights. When I light my scene I always try to use as minimal lights as possible so I'm not killing my render time. I have 5 lights that I have created in my scene. I have the subtle HDR dome light, two spot lights (one key and one fill), and two directional lights (one linked to the character and one linked to the background by light centric linking). I also have shadows turned on for only two of my lights, my key and one directional light. You might not even need it on your directional unless you are casting shadows on your background from your directional. Starting with your Key Spot light, make sure that it has a Quadratic decay rate, and you turn it into an area light as a rectangle shape and with high samples of 3 and low samples of 2. Turning it into an area lit will make your lighting a lot prettier but also give you the control you need of a spot light. How you set your Cone Angle, Penumbra, and Dropoff will be totally up to your creative eye.
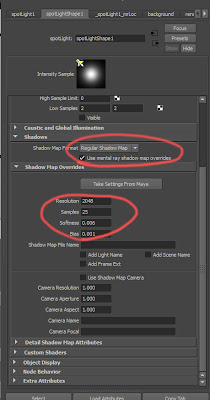 There are several ways to do shadows but mental ray works best with raytracing shadows more than using depth map shadows. It's render is built specifically for raytracing as opposed to other renderes such as renderman. For a special case of rendering lighting on the HR characters, we are going to use a mental ray shadow override because it works best for the targa files on hair for the characters. Next, scroll down to mental ray/shadows and click the box that says Use mental ray shadow map overrides. Make sure your shadow map format stays at regular shadow map. I found that the settings of resolution, samples, and bias worked best as the settings above. The softness of your shadow will be dependent on your artistic eye. It will change depending on how far a shadow will be cast on an object or how close.
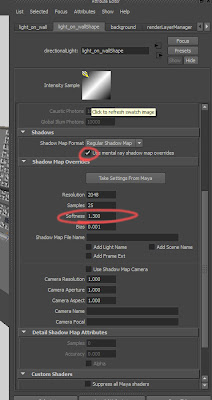 On one of my directional lights, I turned on shadows to cast onto the background. As you see above the softness value has been changed.
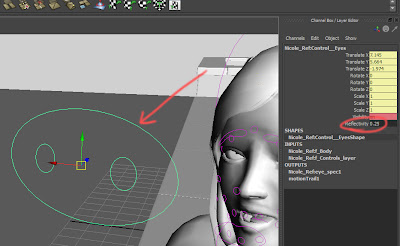 Once you got your lighting set up and begin testing your renders, you will begin to see how the eyes are reacting to the reflections of the HDR dome light. The reflection on the eyes will need to change depending on the HDR you use. There is a control that I created that will make it easy for you to do this. If you select the main eye control on the rig and go to your channel box you will find and attribute named reflectivity. You can set a float value anywhere between 0 to 1.
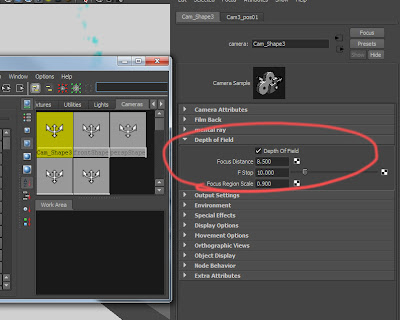 In most of our shots we will be adding depth of field. Just in case you might not know where that is located, here it is.
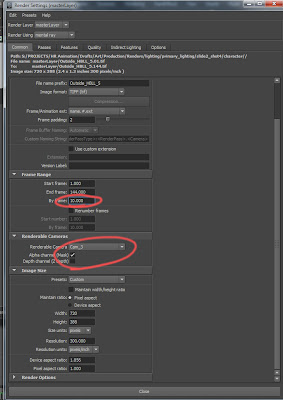 When you start your first batch renders to see how your lighting is working along with it's animation, it is good practice to render the sequence on 5's or 10's rather than 1's. This is a faster way of locating problems quickly. Under render settings and under frame range you can control this in the by frame tab. Also make sure your Depth channel is unchecked since you are already calculating depth of field in your renders.
 Since the camera you will be using in the HR scenes will not be moving during the entirety of the shot, you will not have to render several frames of the background. It will be easier to just render your background seperate from your characters on one layer and one frame. Then render your characters on a seperate layer without the background. An example of this set up is above.
 These two images are an example of a render of the masterlayer and the background.
 Finally, in the process of solving any major flickering. This is after the fact rendering all your frames out, (because this might happen on one frame that you could not have predicted) the values circled above is what you will be adjusting to test things out. You will also need to enable map visualizer and diagnose finalgather. When you run a preview render with these checked on you will get a render scattered with green dots. These dots will tell you where the areas of flickering will most likely occur. Using this information, adjust the above values accordingly until the dots lesson. Then re-render that one or two frames that flickered and replace them with the bad images and wala. FIXED.
WHERE YOU WILL BE PLACING YOUR RENDERS
As far as where you will be placing your renders when setting your project, go to S:/PROJECTS/HR Animation/Drafts/Art/Production/Renders/Lighting/ in lighting you will have 3 folders. Primary_lighting, secondary_lighting, and temp_practice. Your experimentation will go into temp_practice and delete your files when your done. The renders that you do on 10's will go into Primary_lighting, the renders that you do on 1's will go into secondary and this is where you will render out all your final passes for compositing. Inside the primary and secondary folder, you will need to make and shot folder of the shot your lighting, inside of that you will need to make both a background and character folder. Background will be for your background render and primary will be for your sequence batch renders of your character animation.
Also, when you begin lighting a shot go to S:/PROJECTS/HR Animation/Drafts/Art/Production/Shots/ then navigate to your shot. Inside that folder make a folder called lighting and save a copy of the .mb file you be working on.
cheers
