Friday, August 13, 2010

Of Pioneers and Wagons

Photobucket
This has been one of the funnest projects that I have worked on. It has been a goal of mine for a long time to A) Work with actors on a green screen, B) Composite live action plates with CGI elements, and C) Be a part of a story telling experience from beginning to end.
Our whole team can now say they accomplished this. Everybody in the Film or Animation industry should have an opportunity to work on something similar.
We learned a lot through this project, and there were some interesting challenges that we had to overcome along the way.
Photobucket
Talent and the green screen: It is best to know exactly what you need before going to the green screen. We had very limited space for our shoots, which meant that we had to be careful with our placement of the Talent in front of the screen as well as placement of the lights on the set.
We did well in this area but we didn't get everything (specifically the Talent saying ALL the lines that they need to say). This means that there was way more After Effects corrections than necessary.
Blending CGI objects into a "live action plate" with the talent: This was a pretty fun challenge and also goes back to preparations on the green screen set.
The main problem we faced here was getting rid of the shadows that were created by the folds of the greenscreen, due to us barely having enough green material to cover up everything that needed to be covered. Better preparations and a bigger budget can probably solve the problem.
Syncing voices with the talent, and fixing the mouth shapes that don't work: We had to do some clever masking effects in After Effects to work through this. The result was not quite as seamless and a lot more comical than we anticipated.
Creating an environment that doesn't actually "exist": I was fairly impressed with how we pulled this off. All of the environments exist, but not as they appear in the final composition. Each environment was pieced together from HiRes images that were taken from the Utah area.
Photobucket
Something that could make this work better on future projects is to label the layers making it easier to manipulate them.
Creating a digital Zoom on an environment: This was a fun little challenge required some clever use of After Effects tools and position of layers. In essence, making After Effects a digital version of Disney's Multiplane Camera.
Blending CGI animation into the mix:

The biggest challenge was with rendering and figuring out the best way to render everything.

Photobucket
It was also a minor challenge to figure out exactly how the Talent would interact with the CGI elements. Normally you would have a live action plate that you would have to fit the CGI elements into, but we did it somewhat the opposite way here.
Making sure the scale was relatively consistent:
This was only a minor challenge, but it was never completely solved, which is OK because it works with the style. We tried to make it consistent by having a guide from the beginning that would show the size difference. We also only sized down the bodies, thus helping maintain the integrity of the images.

There were other challenges that weren't fixed very well or could have been done better:
Lighting consistency: As we had to work with talent individually and on different days, the lighting wasn't always very consistent (i.e. the professor on a saddle and the Sam and Becky on the wagon). The problem was primarily with limited room on the set and awkward shadows.
Work around: A way to solve this problem might be to situate the screen in a more neutral location in the room, and mark where lights should be on the floor.
Camera limitations: The camera we used didn't have the ability to take rapid pictures, which made it difficult to capture all of the expressions and the poses of the Talent. It was especially difficult to capture all of the horses movements.
Work around: Well ... we could either find someone with a different camera, or have a bigger budget to buy a better one.
Talent performing to big heads: When we did our shoots, we didn't take into account that the heads were going to be two or three times bigger than normal. Therefore every gesture that was made where a hand went up to a face, or taking off a hat needed to be manipulated in after effects.
Work around: One idea is to have them wear a "Big Head" shaped sphere and perform to that. Another less embarrassing way might be to let them imagine themselves with a larger head while doing their motions.
This could also be easier if we purchase or make a shirt or bib of green material for the Talent to wear after wearing the costume.
Horses on the green screen: The camera wasn't the only problem with the horses. It was very difficult to ensure that the horse was covered at all times by our small screen.
Photobucket
Work around: One way could be to put the screen on a wheel system to be able to role it behind the horse, at which ever angle the camera needed. Another way is to find bigger green screen surface.
"Big Head" style: Since we were pressed for time, we had to hurry through some parts of the process and this also included the way the heads were connected to the bodies. Therefore, the style was very inconsistent.
Work around: One way would be to do a couple of master poses of the Talent in extreme positions and have the lead place the head and body in the right positions with a fluid transition between the too. This would also require close collaboration between everybody involved with this part of the process.
Mouth shapes and head positions separated: This is part and parcel to the acting-to-big-heads problem. We forgot to have Becky say her lines when we had her on set the first time, so it was difficult to match her mouth shapes to the head angle. Separating the mouth and the head also made her animations inconsistent with every other character.
Work around: The angle of the head needs to be as close as possible to the mouth shapes that are used. The lighting also needs to match as close as possible.

Ending on a high note:
One thing that was particularly helpful was to have very well made CGI assets, that were both well modeled and textured. This made allowed a lot of freedom in our placing them into the scene, and allowing us to come really close to the camera and not lose much quality.
The only thing that could have been better with this is to get rid of some of the assets from the wagon, to speed up render time. The wagon was well done, and all the pieces would be great for a demo reel, but they weren't all necessary for the project cause we never really looked inside the wagon.

Wednesday, May 12, 2010

Refreshing textures in Mental Ray

While this was not an issue with 2008, with our new 2010 versions of Maya it seems that it is needful to be more careful with where we are putting asset files such as textures etc.

One problem I ran into is that I was working on a texture (rendering, tweaking, rendering again) Mental Ray would keep rendering my old texture even after I had loaded it again in Hypershade. (The swatch would update but the render would not)

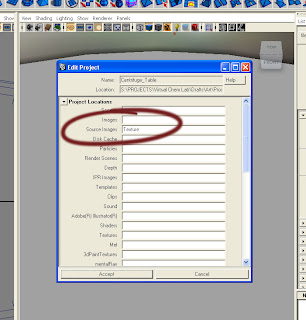
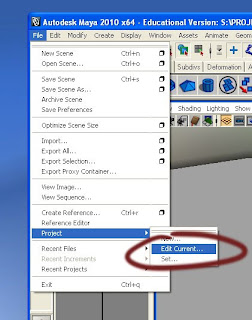
The way to solve this problem is to set your project to the current folder you are working under. In the case of our Virtual Chem Lab project, you would set the project to the main asset folder where everything is under.

Example 3D_Maya>Inorganic/Assets/Centrifuge_table (You would set the project to "Centrifuge_table."

From there, make sure your textures are located right underneath your "sourceimages" folder that Maya looks for. It will not work if you put it in any other folder. However, you can name the "sourceimages" folder whatever you want. I illustrated this below with screen grabs.


With our VCL pipeline, Rob created a folder called "Texture" in every asset main folder. It is fine to use this as the "sourceimages" folder, but it is important to type it in the "sourceImages" box exactly as it appears in the folder name. Problem solved! One more thing, the texture file needs to be directly inside this folder, it cannot be in a subfolder inside the folder, or it wont work. If organization is a big thing for you, I would recommend creating subfolders for each part of your asset, and then when the texture is final, bringing it back up directly under the "sourceimages" folder.

Friday, April 16, 2010

Modeling Techniques

Hey Guys, Since our next project is going to be pretty modeling intensive, Rob wanted me to do some modeling tutorials, and then publish what I learned here. I found some great techniques to model complex geometry.The First step is to find a good set of photos or drawings, and then set them up as image planes in the corresponding orthographic views. In this case a 69 GTO. It's impossible to model accurately without this step.
Once the image planes are set up create a basic polygon, in this case a cube, and add enough subdivisions to get the basic shape. Scale edge loops and move verticies until the cube matches up with the drawings. Do this in each of the orthographic views. Try to keep edge loops at places where there are divisions in real life, such as around the door, hood, trunk, glass, etc. At this stage we are not worried about small detail.After I created the basic shape, I went in and deleted half of my cube making it easier to work with. Then I adjusted edges and verticies to make the mesh more accurate (real life photo reference is great for this). Keep edge spacing as consistent as possible except where there are sharper edges. I also went in and deleted the glass.One at a time I went in and selected the faces of the different body panels. I then used the extract command to make each panel it's own piece of geometry. A good rule is that if it's seperate on the real object, seperate it on the mesh. This way it's much easier to add detail to individual panels, but the overall shape and edges of everything still match up.Next I went in and defined and reworked each separate panel, until it was the shape I wanted, then I started to add other details. The chrome trim was extruded from the edges of the panels and then extracted. I built the chrome bumper and grille the same way extruding the edges and using my reference drawings in the orthographic views. Finally I went in and added the GTO decals, lights, mirrors, glass, and wheels. Then I duplicated all the surfaces and combined them with the other half to make a full car.All done. I hope this helps with some modeling concepts when dealing with complex hard surfaces.

Tuesday, April 13, 2010

Jibba Jabba

Hey y'all. I've been trying to do research on basic jib jab techniques to get ready for that short pioneer jib jab project coming up.

Here are some fun examples of the different stylistic approaches to jib jab animation:

Time for some Campaigning :
http://www.youtube.com/watch?v=adc3MSS5Ydc
Obama Saves the Day:
http://www.youtube.com/watch?v=kVFdAJRVm94m
Monty Python:
http://www.youtube.com/watch?v=hQ72fcHDUC8
Hedgehog in the Frog:
http://www.youtube.com/watch?v=dRsXU4Q6a0Q
Tale of Tales:
http://www.youtube.com/watch?v=Tmcp4XNCWRY&feature=related


So I tried to do a little test animation to get my feet wet. It's not spectacular but it utilizes some of the basic principles of jibba jabba:


Here are some tutorial sites that I came across that I found pretty helpful. I'll add more as I find them:

Basics:
http://ae.tutsplus.com/tutorials/beginner-series/create-the-jibjab-effect/
Putting it together:
http://blog.jibjab.com/2008/07/14/putting-it-all-together/
Utilizing the Puppet Pin Tool:
http://www.motionworks.com.au/2009/02/the-dancing-can-part-1/
Overview for AfterEffect tools:
http://help.adobe.com/en_US/AfterEffects/9.0/WSB2E4332E-8EA6-4fa2-AF6F-D50C22088EE3a.html

Tuesday, March 30, 2010

Pipeline in a Box summary and Evaluation

Hi everybody,
Rob had me research a pipeline tool created by Adam Sidwell, a former BYU grad. The pipeline is a tool that comes along with the book "Body Language," which is a pretty nice rigging book. We are thinking about implementing it for our next project, but need to decide if it is worth it. Here is a brief summary of it:
1.) Automated project setting which has referencing tools that run off of it. In essence, by setting your project (similar to setting project in Maya) all the referencing of needed assets is automatically set up for you. (i.e. no "what asset was needed in this shot???")
2.) File system broken up by show-sequence-shot.
3.) Ability for a pipeline TD to "force" people to use a certain asset such as texture or rig. (One example would be: lets say you have a character that has a certain texture, but for one scene this character needs a muddy texture because he fell in the puddle. The TD would be able to force that texture for the shot without anyone else having to think about it.)
4.) shotinfo.info files- Using an extremely simple syntax, the pipeline TD is able to type in a text document what assets are needed for a shot, and Maya and the pipeline tools will automatically read, parse, and execute those assets to be referenced.

That is what I understand of the pipeline so far. As you can see it has several positive aspects. Here are some things that I felt were negative about it.

1.) This pipeline seems to be geared towards a film-type production. (Animation-heavy work) The tools in it were created to make referencing different rigs and textures for the same character. Im not sure that the projects we do at the CTL are that in depth to have seperate rigs and textures for each object/asset.
2.) One of Robs main concerns was not knowing where some people have put their files. In this pipeline, File placement is crucial and its a little bit convoluted at first. Getting everyone to know where to put their files would be fairly difficult, so one of us (or two) would need to be in charge of the pipeline and placement. If this person was gone, things could get slow and progress could be halted.
3.) Right now, we don't set projects when we open up Maya. We just open up the mb file and work on it. With this pipeline, setting your project is another very crucial aspect and im not sure what would happen if you were screwing this up, because I havent had much experience with it yet.
4.) A designated Pipeline TD **MUST** keep up on everything. Like, this person has to know everything about every shot, because he is the one that sets up the files that are needed. If you do it ideally as well, the TD would also be setting permissions on folders. But thats not totally necessary.

My evaluation-
I think that although some aspects of this pipeline are complicated and Im still not 100% knowledgeable about this certain pipeline, I think it is worth trying out. Just for the experience, really. The reason for this is because it is good experience to work in an actual pipeline because that is what they do in the industry. It will also give some of us the opportunity to put "pipeline TD" on a resume. File organization is so important with a production that any hands-on experience with setting this up and keeping it working will give someone a definite edge if this is something they are interested in. Also, this thing would be easy to scrap if it wasn't working out for us.

Sorry that was long, please let me know what you think and any problems you think our current pipeline has! I havent been here long so I dont know much about that.